Sometimes a technician may ask for your IP and/or MAC address to help diagnose network issues. Follow the steps below to acquire these addresses for your system.
An Internet Protocol (IP) address is a numerical label such as 192.0.2.1 that is connected to a computer network that uses the Internet Protocol for communication. A MAC address is a 12 digit hexadecimal number that is most often displayed with a colon or hyphen separating every two characters (an octet), making it easier to read. Example: A MAC address of 2c549188c9e3 is typically displayed as 2C:54:91:88:C9:E3 or 2c-54-91-88-c9-e3.
Once you find your MAC, please visit our Mobile Registration page to register it manually.
Table of Contents
Find IP & MAC Addresses on Windows
1. Press the Windows key or Start Button and type "cmd" (without the quotes) in the search box. Press Enter to open a new command prompt.
2. Type "ipconfig /all" (without the quotes) and press Enter.
3. Find the lines labeled IPv4 address (for the IP address) and Physical Address (for the MAC address).
Make sure the "Random hardware address" feature is disabled. Visit this page to learn how to turn it off.
Find IP & MAC Addresses on macOS
1. Click the Apple logo on the top left of the screen and then click on System Preferences.
2. Click on the Network icon.
3. Make sure that the connection being troubleshooted is selected on the left (Wi-Fi for wireless and Ethernet for wired).
4. Click on the Advanced button.
5. The IP address can be found under the TCP/IP tab (IPv4 Address).
6. The MAC address can be found under the Wi-FI tab (Wi-Fi) or Hardware tab (Ethernet).
Find IP & MAC Addresses on Linux
1. Open a terminal
2. Type /sbin/ipconfig
3. This will list your IP address as well your MAC address.
Find MAC Address on iOS
**IMPORTANT**: Make sure you are connected to the WiFi Network first, either 'UCInet Mobile Access' or 'ResNet Mobile Access'
1. From the Home menu, tap on Settings.
2. Tap on Wi-Fi.
3. Tap on the Information Icon ![]() next to UCInet Mobile Access or ResNet Mobile Access.
next to UCInet Mobile Access or ResNet Mobile Access.
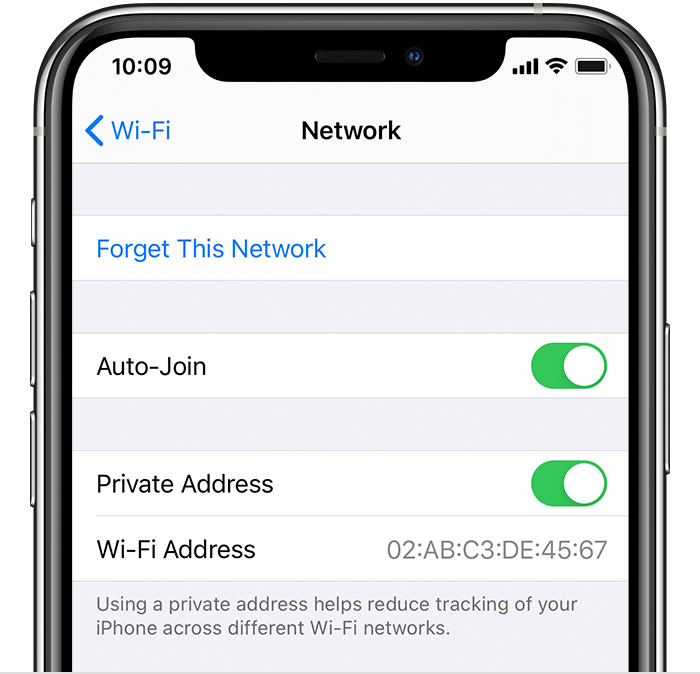
**NOTE: Starting on devices with iOS 14, Apple implemented 'Private MAC Addresses'. If you see a toggle that is on next to the MAC address, we recommend you turn this feature off to reveal the 'real' Wi-Fi MAC address. You can then visit https://oit.uci.edu/reg.
to register the MAC. Below are instructions on how to disable it.
Turn Private Address off or on for a network
Private Address is turned on by default. For improved privacy, leave it on for all networks that support it.
iPhone, iPad, or iPod touch
- Open the Settings app, then tap Wi-Fi.
- Tap the information button
 next to a network.
 - Tap to turn Private Address on or off. If your device joined the network without using a private address, a privacy warning explains why.
Find MAC Address on Android
1. On the Home screen, tap the Menu button and go to Settings.
2. Tap About Phone.
3. Tap Status or Hardware Information (depending on your model of phone).
4. Scroll down to see your MAC address.
Disable Private Wi-Fi Address/MAC Randomization
- Open the Settings app
- Select Network and Internet
- Select WiFi
- Connect to the Wireless network
- Tap the gear icon next to the current connection
- Select Advanced
- Select Privacy
- Select "Use device MAC"
- Navigate to "Settings"
- Select "Connections"
- Select "WiFi"
- Select "the Wireless Network you wish to connect to"
- Tap the gear shaped icon next to the network you connected to
- Select "Advanced"
- On the next screen there is a menu labeled "MAC Address Type".
- Tap on "MAC Address Type"
- Select “Use Phone/Device MAC”
Microsoft
Xbox One
- Go to My Xbox in the Xbox dashboard and select Settings.
- In the Settings pane, select Network.
- Select Advanced Settings from the Network Settings tab.
- At the bottom of this screen, you'll see a heading for Wired MAC and Wireless MAC.
Xbox Series X or Series S
- Navigate to the Settings page.
- Select Network.
- Select Advanced Settings.
- Under IP settings, the MAC address will be listed next to Wired MAC and Wireless MAC on the right-hand side of the screen (this is also where the IP address and other information is located).
Xbox 360
- Power on your XBOX 360 without a disc in the system.
- Scroll (if necessary) to My Xbox.
- On the right, select System Settings.
- On the next screen, select Network Settings.
- Select Configure Network.
- Select the Additional Settings tab.
- Select Advanced Settings.
- Toward the bottom of the screen you should see Wired MAC Address. The MAC Address consists of the characters below this.
Xbox
- Power on your Xbox without a disc in the system.
- Select Settings in the Xbox dashboard, then select Network Settings.
- The MAC address of the system is located in the bottom right-hand corner of the Network Settings screen (It usually has “MAC=” in front of it).
Sony
PS5
- Power on the PS5 without a disc in the system.
- In the PS5 menu, arrow up and select Settings.
- Scroll down to Network.
- Scroll down to View Connection Status.
- The MAC Address will be listed next to MAC Address (LAN) and MAC Address (Wi-Fi). The LAN address is the Wired MAC address.
PS4
- Power on the PS4 without a disc in the system.
- In the PS4 menu, arrow up and select Settings.
- Scroll down to Network.
- Scroll down to View Connection Status.
- The MAC Address will be listed next to MAC Address (LAN) and MAC Address (Wi-Fi). The LAN address is the Wired MAC address.
PlayStation 2
- Power on your PlayStation 2 with the Network Adaptor start-up disc.
- Once the disc is loaded, select ISP Setup and then agree to the license agreement that is presented.
- When prompted for a network type, select Local Area Network (LAN).
- Next select Automatic Configuration.
- At the Connection Test screen, select Advanced.
- On the next screen you should see the MAC address of the system. The LAN address is the Wired MAC address.
PlayStation 3
- Navigate to Settings.
- Select System Settings.
- Select System Information.
- View information on the PS3 system. The MAC address is shown there.
Nintendo
Nintendo Switch
- Select System Settings from the HOME menu.
- Scroll down and select Internet.
- The Nintendo Switch console's MAC address will be listed under System MAC Address. This is the wireless MAC address.
- Alternatively, the wired LAN MAC address can found under System Settings -> Internet -> Internet Settings -> Wired Connection.
Wii
- From the Wii Channel screen, select the Wii button, then go into Wii Settings.
- On the second page, find the option Internet, then go to Console Information.
- This screen should have a line with USB Ethernet Adapter MAC Address or LAN Adapter MAC Address or similar. The LAN address is the Wired MAC address.
GameCube
- Remove the GameCube’s broadband adapter from the console.
- Printed on the underside of the adaptor is the MAC address.
DS
- From the menu, navigate to Nintendo Wi-Fi Connection Setup.
- Select Options, then System Information. The MAC address is on the top line.
3DS
- From the HOME menu, highlight and select System Settings.
- Select Internet Settings.
- Tap Other Information.
- Tap Confirm MAC Address. Your system's MAC Address will be displayed on the screen.
Wii U
- From the Wii U menu, select System Settings.
- Using the left stick, select the Internet icon and press the A button.
- Select View MAC Address and wait for the MAC Address to be displayed.
Streaming Devices
Apple TV
- With your Apple TV remote, navigate to and select the Settings icon.
- From the Settings menu, select General.
- Under General, select Network.
- Your MAC Address will be next to either Wi-Fi Address or Ethernet Address, depending on how you are connected to the internet.
Roku/Roku Express
- On the back of your Roku there are six 2-digit pairs of numbers/letters separated by colons, e.g. 00:0D:0A:1H:3G:5C. One set is for Ethernet and the other set is for the wireless.
- Alternatively, from the Roku home screen, select Settings > Network and locate the value next to Wireless MAC Address.
Chromecast
Locate the MAC address during Chromecast setup
- From the "Connect to Wi-Fi" screen of the setup process, in the top right, tap More
.
- Tap Show MAC Address.
Locate the MAC address after Chromecast setup
- Open the Google Home app
.
- Touch and hold your device's tile.
- At the top right, tap Settings
Device information.
- Under "Technical information," check your MAC address.
Chromecast with Google TV
- Turn on your Chromecast with Google TV.
- In the top right corner of your TV screen, select Settings